Oh sunny boy
The sun is by itself worth a paragraph in this blog. When rendering a sun, don't fall into the trap of texturing a sphere with a "sun" texture — this looks very unrealistic. Instead, use a textured quad to display an image of a sun. Photos by NASA are practically unusable here, but the photos do show that the sun as seen from space, is a white ball with a yellowish glow, and has streaks. You can make a sun texture using the GIMP (or Photoshop) and choose Light effects: Nova. Apply radial gradient to fade away to the edges of the image.
When displaying the textured quad in-game, I did not want the sun to visibly rotate as we're rotating the spaceship. The perfect way to do this is to do "cheating spherical billboarding". This ensures that the sun with its streaks remains stationary even when we are rolling the spaceship (and thus, the view). Cheating spherical billboarding works like this:
glPushMatrix();glTranslatef(position.x, position.y, position.z);// reset submatrix to identity: do cheating spherical billboardingglGetFloatv(GL_MODELVIEW_MATRIX, matrix);matrix[1] = matrix[2] = matrix[4] = matrix[6] = matrix[8] = matrix[9] = 0.0f;matrix[0] = matrix[5] = matrix[10] = 1.0f;glLoadMatrixf(matrix);... draw 2D textured quad here ...glPopMatrix();
Use additive blending to give the sun the bright intensity that it has.
Shine a light on me
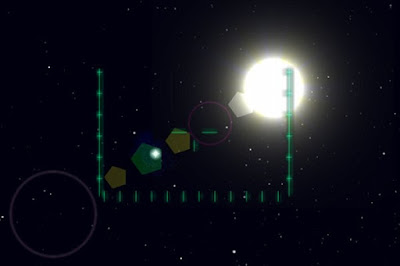
Now that we have a sun, let's get to the lens flare part. A lens flare is a series of rings or circles in the line of sight to a bright flash (like the sun). This line always cuts through the center of the camera. So, knowing the position of the sun and the position of the camera, we can calculate the positions of the flare elements. How many elements you want and what size they should be is up to you.
Note that when looking directly into the sun, the lens flare will be larger than when the sun is off to the side. So, you can use the distance as a measure for scaling the lens flare elements.
When searching the net, you will find that NeHe's tutorial renders a 3D lens flare even though a lens flare is really a 2D special effect, as it occurs in the lens of the camera.
The math for a 3D lens flare is less intuitive than for a 2D lens flare and drawing the flare is easier in 2D, so I implemented it as a 2D image post-processing effect.
The following needs to be taken into consideration:
- when the sun is visible, a lens flare effect should be drawn
- use gluProject() to find the 2D onscreen position of the sun
- gluProject() returns pixel values; scale these to fit your viewport
- the distance between the sun's 2D position and the center of the screen is a measure for the scale of the lens flare elements
- vary color and size of the flare elements
- use additive blending because we are working with light effects
- the sun may be occluded by another object in which case a flare should not be drawn
If there is an object in front of the sun, no lens flare should be drawn. NeHe's tutorial shows that it's easy to do a depth test here by reading a single pixel from the depth buffer using glReadPixel(). The fun part is that in my code the sun is drawn infinitely far away with depth testing disabled, so if the depth buffer contains a value here, there must be an object in front of it.
The easiest way to draw the flare elements evenly spaced over the line of the flare, is to make a vector from it, normalize it, and "travel along" this vector to place the elements.
The code looks just like this:
GLfloat center_x = SCREEN_WIDTH * 0.5f;GLfloat center_y = SCREEN_HEIGHT * 0.5f;// screenPos is the onscreen position of the sun// mind that the pixel coordinates have been scaled// to fit our viewportGLfloat dx = center_x - screenPos_x;GLfloat dy = center_y - screenPos_y;GLfloat len = sqrt(dx * dx + dy * dy);// normalize the vectorGLfloat vx = dx / len;GLfloat vy = dy / len;// choose a spacing between elementsdx = vx * len * 0.4f;dy = vy * len * 0.4f;// note that we already are in 2D (orthogonal)// mode hereglPushMatrix();glTranslatef(screenPos.x, screenPos.y, 0);// travel down the line and draw the elementsfor(int i = 0; i < numElements; i++) {glTranslatef(dx, dy, 0);draw_flare_element();}glPopMatrix();
The result is quite nice. You can make things crazier by adding more circles, starbursts, hexagonal elements, and horizontal blue anamorphic streaks.