Monday, January 23, 2012

FTGL font rendering in multiple colors

In my last post, I was talking about font rendering in OpenGL by using the FTGL library. What I really wanted to have, however, was displaying a font with multiple colors. That is something FTGL can not do directly out of the box, but you can use a trick. Here's a short description of two methods to display text using multiple colors per character.

Method 1: Use a texture
The GLPolygonFont can be textured. Just bind your texture and call ftglRenderFont(). It really is as simple as that. The texture will stretch over the entire text drawn; if you want a texture per character then you will have to render the characters one by one. Mind that texture is laid over the bounds of the text. The bounds are usually a bit wider than you may expect. This example image was created using an image of a gradient as texture:


A drawback of using GLPolygonFont is that it has lower performance than for example the GLBufferFont. Also, at low resolutions you will see jagged edges.

Method 2: Using the stencil buffer
OpenGL's stencil buffer can be used for masking. You can tell OpenGL to draw where the stencil buffer is empty, or where the stencil is black. So to draw text in two colors, first draw one color, then draw a shape in the stencil buffer, and then draw the second color. It works a bit like woodcut printing in multiple colors. This example image was created using a GLBufferFont and the stencil buffer:


A drawback of the stencil buffer is that you will see jagged edges if you make a slanted line in the buffer. (It doesn't really show in this image, but they are there. The stencil buffer creates "hard" pixels.)

The stencil buffer is easy to use. The code for creating the image above is like this:
    glColor4f(1, 0, 0, 1);
    ftglRenderFont(font, "World", FTGL_RENDER_ALL);

    glEnable(GL_STENCIL_TEST);
    glClear(GL_STENCIL_BUFFER_BIT);
    glStencilFunc(GL_NEVER, 0, 0);
    glStencilOp(GL_INCR, GL_INCR, GL_INCR);

    ... draw triangle (in stencil buffer) ...

    glStencilFunc(GL_EQUAL, 1, 1);
    glStencilOp(GL_KEEP, GL_KEEP, GL_KEEP);
   
    glColor4f(1, 1, 0, 1);
    ftglRenderFont(font, "World", FTGL_RENDER_ALL);
    glDisable(GL_STENCIL_TEST);
The stencil buffer can also be used to other cool stuff like making holes in your text, or drawing text as a mask. [By the way, mind that masking using blending is near impossible using FTGL — ftglRenderFont() sets the glBlendFunc() for its own purposes.]

Concluding
I've shown two ways of rendering text in multiple colors. Both have pros and cons. Of course, there is a third method; use textures. If your text is static then you might as well use a single texture for the text. If your text is not static, you can still use one texture per character (glyph) but you lose the benefits that FTGL gives you.

Sunday, January 15, 2012

OpenGL font rendering with FTGL

OpenGL is a wonderful library for rendering graphics, but there is one thing it can not do: render text. It wasn't exactly made for this purpose. Graphics and text are two different things. However, at some point you are going to want to display text in your rendered scene. Then you will encounter the terribly missing feature of OpenGL, its inability to render text. There is no such thing as a glPrintf() function.

Drawing text with OpenGL
OpenGL is a graphics library and it can draw anything you like, even characters. But OpenGL is a very low level library and leaves drawing characters as an exercise to the programmer. There are a number of approaches you can use to draw text:
  • make a "stick font" in which all characters are made up out of lines. This looks really crappy but might be OK for an eighties style 3D vector game.
  • make an outline font in which all the outline of characters are drawn as lines. This looks fun but again, for an eighties style 3D vector game. Not only that, it also takes a lot of work to define the vertices for all characters.
  • load a bitmap font and use glBitmap() to render the characters. This is acceptable but mind that bitmap fonts do not scale well to today's high resolution displays. The characters will look pixelated and blocky when scaled up.
  • use textures; every character is a rendered texture of an image of a character. This works well but it takes a lot of effort to correctly create the textures for every character. Again, mind the scale. If you scale too high, it will look pixelated and blocky.
So, drawing text is hard. Or you can use an external font rendering library, such as FTGL. FTGL is great. FTGL does the tricks mentioned above for TrueType fonts. Unfortunately, using FTGL can be frustrating because the documentation forgets to mention a some very essential points. Hence the reason for writing this blog entry.

Pitfall #1: Getting FTGL to work
To use FTGL, you should #include "FTGL/ftgl.h". If that produces an error about ft2build.h, you should also install the Freetype development package. Point your include path (gcc -I) and linker path (gcc -L) at the right places.

Pitfall #2: Using orthogonal mode correctly
FTGL can render text on a plane in 3D space, but in general you switch to orthogonal mode using glOrtho() before rendering text. The origin should be set to the lower left or you may get strange results like text appearing upside down. Also, set the current pen color before drawing. That's easy.

Pitfall #3: Using glTranslate*() with raster fonts
FTGL supports two "raster" fonts: GLBitmapFont and GLPixmapFont. GLBitmapFont looks terrible and I would never want to use it, but GLPixmapFont looks nice. One reason to prefer GLPixmapFont over GLTextureFont is performance, another reason might be that it doesn't use texture memory. However, since it is a raster font, you can not scale nor rotate it. You must position using glRasterPos*(). The fact that you can't scale the font makes it less useful because it doesn't give nice results at small sizes. Which brings us to the next point.

Pitfall #4: Font sizes
You might be inclined to think that with ftglSetFontSize() you could set a font's size to 12 points and then get a good result on screen. If only it were that simple. In practice, you might see a blurry mess or even nothing at all. Why is this?
Fonts are rendered using dots per inch. OpenGL, however, has its own coordinate system. You initialized it by calling glOrtho(). Personally, I tend to set glOrtho() to pixel coordinates. Pixel coordinates have no relation to dots per inch, so it doesn't fit. [In theory, you should be able to set OpenGL's coordinate system to dots per inch and get good results right away, but haven't tried this. My guess is that this won't work either because of the following.]
When loading a texture font, FTGL creates textures for every character (or glyph) using the size and resolution parameters passed to ftglSetFontSize(). If you choose the parameters too small, the texture will be small and the result will be ugly. The key is to use fairly high values like 72 or simply one hundred. This may well cause the displayed text to appear huge; scale the result down again with glScale*() one tenth times or whatever works for you.
Since OpenGL is very good at scaling textured images, the end result will be good looking. Isn't it kind of dumb to use a large font size and then scale it down again? Yes, but if you don't, chances are that it won't be good looking.

Pitfall #5: Font scaling
This is pitfall is a consequence of scaling. When you scale the FTGL font, you must take the scale into account when working with bounding boxes and string widths.

Wrapping up
FTGL is a very nice OpenGL font rendering library with good performance. It has an easy to use C++ API and good standard C interface. The documentation is a bit lacking though. For example, to get the string width in standard C, use ftglGetFontAdvance() * scale.
Let me end with a link into the FTGL User Guide at SourceForge.

Monday, January 2, 2012

NSTabView tutorial

Let's kick off the new year with some nice MacOS X Cocoa programming. I made a small music player in which you can switch views by pushing buttons. So on the click of a button, it replaces the content of the window with a new view. It is an interface that you now often see on phones and tablets, but I liked choosing this interface for my MacOS X desktop music player program.

There are different ways to accomplish the desired effect. I started out by replacing the window content, but the code turned out much cleaner when I opted for NSTabView. I didn't find many good examples of using NSTabView online, hence the reason for writing this blog entry. Cocoa programming is not very hard, just very confusing if you don't know how to use its components.

Start out by dragging an NSTabView control to your window in Interface Builder (IB). If you want, you can make the tabview encompass the whole window. By default, a tabview has a row of buttons with which the user can select tabs. In my case, I want to have a single button that controls the tabview. You can disable the row of buttons by selecting Style:Tabless in the Attributes Inspector, but it is best to leave it on while still developing.
The NSTabView has a number of Tabs you can set in the Attribute Inspector. This sets the size of the internal array that point to the views. Also, set the Initial Tab to the tab that you want it to display first.

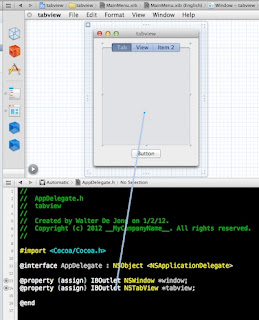
Now open the Assistent editor and Ctrl-drag the NSTabView into the source AppDelegate.h. This will create the IBOutlet for this tabview. You can now use [self tabview] to programmatically address the control in AppDelegate.m.

You would think there is a way to hook up NSViews to the NSTabView from within IB ... I have not found out how to do this. So to make it display your custom views, you will have to tell it from code.
Oddly enough, NSTabView doesn't directly deal with views. It deals with NSTabViewItems. We don't have to deal a lot with NSTabViewItems to accomplish what we want, but you should be aware that NSTabView uses tab view items that hold the views for us.

Now, you can either add a new custom view in MainMenu.xib or create a new NSViewController class. The first option sounds easier but your application will have to contain code to control all these views. It makes more sense to give each view its own controller. Especially if your project is large you will want to have separate views and view controllers. It keeps the code cleaner and even makes the views reusable.

Let's create a new NSViewController class. Choose from the File menu New File and select Cocoa Objective-C class. Next, choose your class name "FirstViewController" and choose Subclass of NSViewController. This creates three new files: a header, a .m source, and a FirstViewController.xib. The XIB contains your new custom view. Start out simple; draw a label saying "View 1".
Repeat this step for view 2 and any other views you may have.

Now we have a NSTabView in the main window and a bunch of NSViewControllers with associated custom views. We want to put the views into the tabview.
First we have to tell the application that it has these custom views. The easiest way to do this is to instantiate them in IB. Open the MainMenu.xib and drag an NSViewController object from the Object library into the area where the other objects (like File's Owner, First Responder, and AppDelegate) are. Select the NSViewController and in the Identitity Inspector, set the custom class to FirstViewController. In the Attribute Inspector, set the Nib Name to FirstViewController.
Open the Assistent editor and Ctrl-drag the view controller icon into AppDelegate.h. Name it firstViewController. This should create a line like:
@property (assign) IBOutlet FirstViewController * firstViewController;
This will create a compiler problem that is easy to solve; in the top of AppDelegate.h put:
#import "FirstViewController.h"
Now we can finally go tell NSTabView to use this view. Open AppDelegate.m and implement this code:
- (void)applicationDidFinishLaunching:(NSNotification *)aNotification {
    // Insert code here to initialize your application
   
    // put the views into the tabview
    NSTabViewItem *item;
    item = [[self tabview] tabViewItemAtIndex:0];
    [item setView:[[self firstViewController] view]];
   
    item = [[self tabview] tabViewItemAtIndex:1];
    [item setView:[[self secondViewController] view]];
}
Build and run the application. The tabview should be working now.
For code cleanliness, I numbered my tabs using an enum so I can address them using symbolic constants. It is also possible to give each tab an identifier and select them by identifier.

Originally I wanted to have a single button control the tabview, so Ctrl-drag the button right into AppDelegate.m to create an IBAction for the button. What's really lame is that you can't ask an NSTabView what the index of its currently selected item is. You get an NSTabViewItem instead but I find working with indexes much more convenient. Here's a simple example of a button that cycles through all tabs:
- (IBAction)buttonPressed:(id)sender {
    static int cycle = 0; // assume initial tab was first
   
    cycle++;
    if (cycle >= [[self tabview] numberOfTabViewItems])
        cycle = 0;
   
    [[self tabview] selectTabViewItemAtIndex:cycle];
}
Now that the tabview is finally working, change the style of the NSTabView control in IB to Tabless.

This concludes my NSTabView tutorial. As said, Cocoa is not very hard, just confusing if you don't have a clue, and it can be tedious to get seemingly simple things done.